What is Authelia?
Authelia is an open-source authentication and authorization server providing two-factor authentication and single sign-on (SSO) for your applications via a web portal. It acts as a companion for reverse proxies like nginx, Traefik, caddy or HAProxy to let them know whether requests should either be allowed or redirected to Authelia's portal for authentication.Documentation is available at https://www.authelia.com/docs.
What is Nginx Proxy Manager?
The Nginx proxy manager (NPM) is a reverse proxy management system running on Docker. NPM is based on an Nginx server and provides users with a clean, efficient, and beautiful web interface for easier management.
Authelia + Nginx Proxy Manager
If you are self host any apps like me in your homelab, you may come across a need of a authentication mechanism to put in front of your application. this is where Authelia comes in. Authelia provides a web application for authentication (make sure you are someone who should be using an application) and authorization (make sure you're permitted to use it) in front of your existing web applications.
there are several ways to implement Authelia, I will be using Nginx Proxy Manager in this example.
What you'll need
- A Server with Docker, Docker-Compose, and Nginx Proxy Manager Installed and Ready
- A FQDN address domain/ Sub-domain you want to use for your Authelia install (e.g. auth.example.com)
- An A-record pointing to the Public IP address where your server is.
- And some time to spend
Installing Docker, Docker-Compose, and Nginx Proxy Manager
You can follow this guide to install NPM.

Create and Configure Authelia instance in NPM
Before we begin with the setup, you should have a valid FQDN address for your authentication instance, in our case it is Authelia. if not, create a CNAME entry that will serve as the endpoint. in this example, we are considering authelia instance as auth.example.com. Install valid SSL certificate for this domain.
Installing and Configure Authelia
For Authelia, you'll need 3 files:
- docker-compose.yml
- configuration.yml
- users_database.yml
Docker-Compose for Authelia
Create a directory called "authelia" and create necessary sub-directories and files
mkdir authelia
cd authelia
mkdir config
mkdir redis
Once we create these sub-directories, create the docker-compose.yml file
nano docker-compose.ymlAnd paste the following text into it:
version: '3.3'
services:
  authelia:
    image: authelia/authelia
    volumes:
      - ./config:/config
    ports:
      - 9091:9091
    restart: unless-stopped
    healthcheck:
      disable: true
    environment:
      - TZ=Asia/Kolkata  #Change to your Time Zone
    depends_on:
      - redis

  redis:
    image: redis:alpine
    volumes:
      - ./redis:/data
    expose:
      - 6379
    restart: unless-stopped
    environment:
      - TZ=Asia/Kolkata
Make sure to cross check the ports are free in your server and change the time zone accordingly.
The Configuration File
let's create the configuration.yml file inside config directory
cd config
nano configuration.yml
In that file, paste the following:
###############################################################
#                   Authelia configuration                    #
###############################################################

server:
  host: 0.0.0.0
  port: 9091

jwt_secret: a-super-long-strong-string-of-letters-numbers-characters
log:
  level: debug

default_redirection_url: https://auth.example.com
totp:
  issuer: example.com
  period: 30
  skew: 1

#duo_api:     ## You can use this api if you want push notifications of auth attempts
#  hostname: api-123456789.example.com
#  integration_key: ABCDEF
#  secret_key: yet-another-long-string-of-characters-and-numbers-and-symbols

authentication_backend:
  disable_reset_password: false
  file:
    path: /config/users_database.yml
    password:
      algorithm: argon2id
      iterations: 1
      salt_length: 16
      parallelism: 8
      memory: 64

access_control:
  default_policy: deny
  rules:
    # Rules applied to everyone
    - domain:
        - "noauth.domain.com"
        - "another-no-auth.domain.com"
      policy: bypass
    - domain:
        - "my1st1factor.domain.com"
        - "my2nd1factor.domain.com"
        - "domain.com"
      policy: one_factor
#      networks:
#       - 192.168.1.0/24
    - domain:
        - "a2factor.domain.com"
      policy: two_factor
#     networks:
#       - 192.168.1.0/24

session:
  name: authelia_session
  # This secret can also be set using the env variables AUTHELIA_SESSION_SECRET_FILE
  secret: a-really-L0ng_s7r0ng-secr3t-st1nggggg-shoul0-be-used
  expiration: 3600 # 1 hour
  inactivity: 7200 # 2 hours
  domain: <example.com> # Should match whatever your root protected domain is

  redis:
    host: authelia_redis_1
    port: 6379
    # This secret can also be set using the env variables AUTHELIA_SESSION_REDIS_PASSWORD_FILE
#    password: authelia

regulation:
  max_retries: 5
  find_time: 2m
  ban_time: 10m

theme: dark

storage:
  encryption_key: a-very-long-strong-key-should-be-used-here
  local:
    path: /config/db.sqlite3

notifier:
#  filesystem:
#    filename: /config/notification.txt
  smtp:
    username: <email address>
    password: <strong password
    host: <SMTP Server Address>
    port: 587
    sender: <Sender Email Address>
    subject: "[Authelia] {title}"
    disable_require_tls: false
    disable_html_emails: false
    tls:
      server_name: <SMTP Server address>
      skip_verify: false
      minimum_version: TLS1.2
configuration.yml
Please make sure that you have replaced below values.
- default_redirection_url:
https://auth.example.com - username:
<email address> - password:
<strong password> - host:
<SMTP Server Address> - sender:
<Sender Email Address> - server_name:
<SMTP Server address>
The Users Database file
Now let's create user database, those who want to access your services
create users_database.yml insider config folder
paste the following into the file, and modify according to your needs.
users:
  john:
    displayname: "John Wick"
    password: "$argon2id$v=19$m=65536,t=3,p=2$BpLnfgDsdfdsgdthgdsdfsdfdg6bUGsDY//8mKUYNZZaR0t4MFFSs+iM"
    email: [email protected]
    groups:
      - admins
      - dev
  harry:
    displayname: "Thanos Infinity"
    password: "$argon2id$v=19$m=65536,t=3,p=2$BpLnfgjhfrtretasdfdfghja44sdfdfa/8mKUYNZZaR0t4MFFSs+iM"
    email: [email protected]
    groups: []
To Create hash password use below command
docker run authelia/authelia:latest authelia hash-password 'yourpassword'Test Authelia Setup
Now you can test the authelia setup, to make sure that the server is configured properly. later stage you can add this to your services
run your authelia docker on parent directory by execute below command
docker-compose upNow go to https://auth.example.com
You should be prompted with the login screen. You can now enter your username and password, and make sure you're able to login.
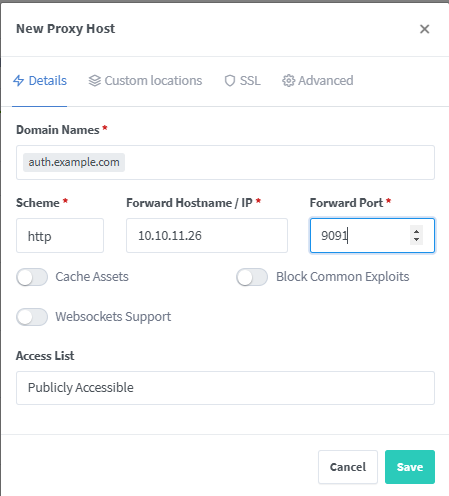
Add Authelia Host to Nginx Proxy Manager
make sure to replace the domain auth.example.com, ip address and port number based on your setup.
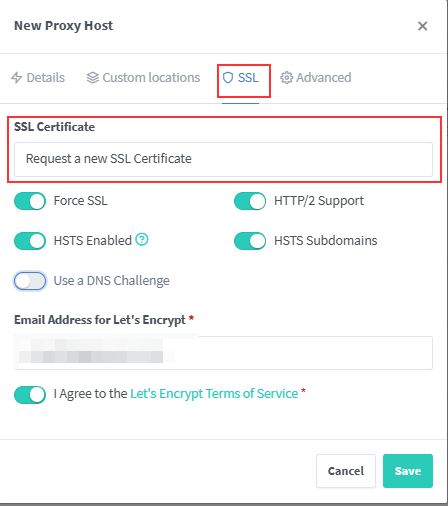
Get SSL Certificate for your Authelia instance
Now, navigate to SSL tab and obtain a valid SSL certificate
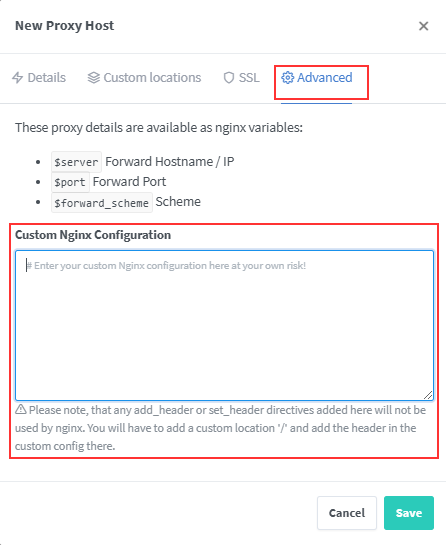
Setup our NGinX Proxy Manager sites for Authelia
Now the final part, You need to add below configuration file in each proxy host that you need to have a SSO login. Copy below code and make adjustments based on the application and past the same in Advanced tab in Nginx Proxy Manager
location /authelia {
    internal;
    set $upstream_authelia http://<authelia internal ip address with port number>/api/verify; #ADD YOUR IP AND PORT OF AUTHELIA
    proxy_pass_request_body off;
    proxy_pass $upstream_authelia;
    proxy_set_header Content-Length "";

    # Timeout if the real server is dead
    proxy_next_upstream error timeout invalid_header http_500 http_502 http_503;
    client_body_buffer_size 128k;
    proxy_set_header Host $host;
    proxy_set_header X-Original-URL $scheme://$http_host$request_uri;
    proxy_set_header X-Real-IP $remote_addr;
    proxy_set_header X-Forwarded-For $remote_addr;
    proxy_set_header X-Forwarded-Proto $scheme;
    proxy_set_header X-Forwarded-Host $http_host;
    proxy_set_header X-Forwarded-Uri $request_uri;
    proxy_set_header X-Forwarded-Ssl on;
    proxy_redirect  http://  $scheme://;
    proxy_http_version 1.1;
    proxy_set_header Connection "";
    proxy_cache_bypass $cookie_session;
    proxy_no_cache $cookie_session;
    proxy_buffers 4 32k;

    send_timeout 5m;
    proxy_read_timeout 240;
    proxy_send_timeout 240;
    proxy_connect_timeout 240;
}

    location / {
        set $upstream_<appname> http://<your application internal ip address with port number>;  #ADD IP AND PORT OF SERVICE
        proxy_pass $upstream_<appname>;  #change name of the service

        auth_request /authelia;
        auth_request_set $target_url $scheme://$http_host$request_uri;
        auth_request_set $user $upstream_http_remote_user;
        auth_request_set $groups $upstream_http_remote_groups;
        proxy_set_header Remote-User $user;
        proxy_set_header Remote-Groups $groups;
        error_page 401 =302 https://auth.<example.com>/?rd=$target_url;

        client_body_buffer_size 128k;

        proxy_next_upstream error timeout invalid_header http_500 http_502 http_503;

        send_timeout 5m;
        proxy_read_timeout 360;
        proxy_send_timeout 360;
        proxy_connect_timeout 360;

        proxy_set_header Host $host;
        proxy_set_header X-Real-IP $remote_addr;
        proxy_set_header X-Forwarded-For $proxy_add_x_forwarded_for;
        proxy_set_header X-Forwarded-Proto $scheme;
        proxy_set_header X-Forwarded-Host $http_host;
        proxy_set_header X-Forwarded-Uri $request_uri;
        proxy_set_header X-Forwarded-Ssl on;
        proxy_redirect  http://  $scheme://;
        proxy_http_version 1.1;
        proxy_set_header Connection "";
        proxy_cache_bypass $cookie_session;
        proxy_no_cache $cookie_session;
        proxy_buffers 64 256k;

        # add your ip range here, and remove this comment!
        set_real_ip_from 192.168.7.0/16;
        set_real_ip_from 172.0.0.0/8;
        set_real_ip_from 10.0.0.0/8;
        real_ip_header X-Forwarded-For;
        real_ip_recursive on;
    }
}
Modify this code and paste it in Advance Tab
You need to adjust below parts based on your setup.
<authelia internal ip address with port number><appname>should be match with the application<your application internal ip address with port number>https://auth.<example.com>/?rd=$target_url;
Now go to Advanced tab Custom Nginx Configuration of respective application.
Click Save, Test Your applcaiton now.
If you need a Video guide, there is an Awesome guide you can follow the same.