
Pi-hole is a fantastic tool that acts as a DNS sinkhole to block unwanted advertisements at the network level. On the other hand, DNSCrypt-Proxy provides an encrypted DNS proxy to ensure your DNS queries are private and secure. Combining these two can offer you an ad-free and secure browsing experience. In this guide, we will walk you through the detailed steps to install Pi-hole with DNSCrypt-Proxy as your DNS resolver.
Prerequisites
Before diving into the installation process, ensure you have the following:
- A server or Raspberry Pi running a supported Linux distribution
- Basic knowledge of the Linux command line
Method 1: Manual Installation
Step 1: Install Pi-hole
First, update your package repository to ensure you have the latest package information:
sudo apt update && sudo apt upgrade -y
Now, install Pi-hole using the following command:
curl -sSL https://install.pi-hole.net | bash
Follow the on-screen instructions to complete the installation. During the setup, you will be prompted to configure your Pi-hole settings. Make sure to note down the admin password.
Step 2: Install DNSCrypt-Proxy
Download the latest release of DNSCrypt-Proxy from its GitHub repository. Replace [version] with the latest release version number:
wget https://github.com/DNSCrypt/dnscrypt-proxy/releases/latest/download/dnscrypt-proxy-linux_x86_64-[version].tar.gzExtract the downloaded file and move the dnscrypt-proxy binary to /usr/local/sbin:
tar -xvf dnscrypt-proxy-linux_x86_64-[version].tar.gz
sudo mv linux-x86_64/dnscrypt-proxy /usr/local/sbin/
Step 3: Configure DNSCrypt-Proxy
Create a configuration file for DNSCrypt-Proxy using a text editor like nano:
sudo nano /etc/dnscrypt-proxy/dnscrypt-proxy.toml
Add your desired DNS resolvers and configure other settings. Here's a basic example:
listen_addresses = ['127.0.0.1:5353']
server_names = ['cloudflare', 'google']
Note : Please modify the port number (5353) based on your requirement
Step 4: Start DNSCrypt-Proxy
Start DNSCrypt-Proxy using the following command:
sudo dnscrypt-proxy -config /etc/dnscrypt-proxy/dnscrypt-proxy.toml
Method 2: Docker Compose Installation
If you prefer using Docker, you can use Docker Compose to simplify the installation process.
Step 1: Create Docker Compose File
Create a docker-compose.yml file with the following configuration:
version: '3'
services:
  pihole:
    container_name: pihole
    image: pihole/pihole:latest
    ports:
      - "53:53/tcp"
      - "53:53/udp"
      - "67:67/udp"
      - "80:80/tcp"
      - "443:443/tcp"
    environment:
      TZ: 'America/New_York'
      WEBPASSWORD: 'your_password'
    volumes:
      - './etc-pihole/:/etc/pihole/'
      - './etc-dnsmasq.d/:/etc/dnsmasq.d/'
    restart: unless-stopped
  dnscrypt-proxy:
    container_name: dnscrypt-proxy
    image: dnscrypt/dnscrypt-proxy:latest
    ports:
      - "53:53/tcp"
      - "53:53/udp"
    command: -config /etc/dnscrypt-proxy/dnscrypt-proxy.toml
    volumes:
      - './etc-dnscrypt-proxy/:/etc/dnscrypt-proxy/'
    restart: unless-stopped
Replace 'your_password' with your desired Pi-hole web admin password.
Step 2: Run Docker Compose
Execute the following command to start the containers:
docker-compose up -dConclusion
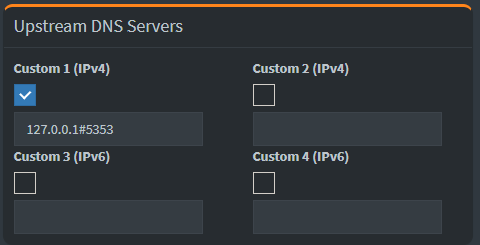
Login to the Pi-hole, the navigate to Settings--> DNS change the Upstream DNS Servers to local (dnscrypt-proxy) address and port number.
By following either of these methods, you can set up Pi-hole with DNSCrypt-Proxy as your DNS resolver. This setup enhances both your ad-blocking capabilities and online privacy. Remember to configure your devices to use Pi-hole as the DNS server to start blocking ads and encrypting your DNS queries.
Enjoy a faster, ad-free, and more secure browsing experience with Pi-hole and DNSCrypt-Proxy!
Happy browsing!