
What is authentik?
authentik is an open-source Identity Provider focused on flexibility and versatility. You can use authentik in an existing environment to add support for new protocols, implement sign-up/recovery/etc. in your application so you don't have to deal with it, and many other things

What is Nginx-Proxy-Manager?
The Nginx proxy manager (NPM) is a reverse proxy management system running on Docker. NPM is based on an Nginx server and provides users with a clean, efficient, and beautiful web interface for easier management. The tool is easy to set up and does not require users to know how to work with Nginx servers or SSL certificates. NPM is an open-source tool maintained by developers from around the world. It is well suited for small server environments and private lab environments. This tutorial will focus on showing you how to deploy the Nginx proxy manager:
What we are doing here?
I will try to explain how to setup a SSO authentication mechanism that can be used for your home-lab projects (Nextcloud, Bitwarden, etc). All these we are trying to achieving with docker :)
Prerequisites
- Nginx Proxy Manager Installation
(https://npm.example.com) - Authentik Server Installation
(https://auth.example.com) - Any hosted application to test
(https://app.example.com) - Some Time ;)
Installing Nginx Proxy Manager
I am not going to deep explaining how to install NPM, you can follow below guide. expecting you have a running NPM server that can be servers as reverse proxy and manage SSL Certificates.
Installing Authentik SSO Server
As I mentioned earlier we will doing this project with help of docker, so I will be following docker-compose method here.
Download the latest docker-compose.yml from here. Place it in a directory of your choice.
If this is a fresh authentik install run the following commands to generate a password
# You can also use openssl instead: `openssl rand -base64 36`
sudo apt-get install -y pwgen
echo "PG_PASS=$(pwgen -s 40 1)" >> .env
echo "AUTHENTIK_SECRET_KEY=$(pwgen -s 50 1)" >> .env
# Skip if you don't want to enable error reporting
echo "AUTHENTIK_ERROR_REPORTING__ENABLED=true" >> .env
You can customize your .env file based on your need. I will be including basic setting that needs this server up and running.
AUTHENTIK_PORT_HTTP=9090
AUTHENTIK_PORT_HTTPS=9443
PG_PASS=i4YC0VKCDzro4i6mlJxXUEsYZIp2MkDazKoArQHv
AUTHENTIK_SECRET_KEY=AebaI13oxBJCylYU8RIcyrQvSjic0tv1y9V70RRDooPtPzVsAU
AUTHENTIK_ERROR_REPORTING__ENABLED=true
.env
Running on custom port
By default, authentik listens on port 9000 for HTTP and 9443 for HTTPS. To change this, you can set the following variables in .env.
AUTHENTIK_PORT_HTTP=9090
AUTHENTIK_PORT_HTTPS=9443
on above .env file you can see I have changed the port to 9090 and 9443. you can change based on your choice, make sure the port is free on your server
Advance .env variables can be found here.

Start the Authentik Server
once you have downloaded the docker-compose.yml and .env file, run these commands to start the server.
docker-compose pull
docker-compose up -d
The compose file statically references the latest version available at the time of downloading the compose file, which can be overridden with the AUTHENTIK_TAG environment variable.
authentik will then be reachable on port 9090(HTTP) and port 9443 (HTTPS).
To start the initial setup, navigate to https://<your server>/if/flow/initial-setup/. There you will be prompted to set a password for the akadmin user.
Add authentik to NPM
Once you have started the authentik server, you need to expose this to internet with valid FQDN and SSL certificate. add proxy host in NPM
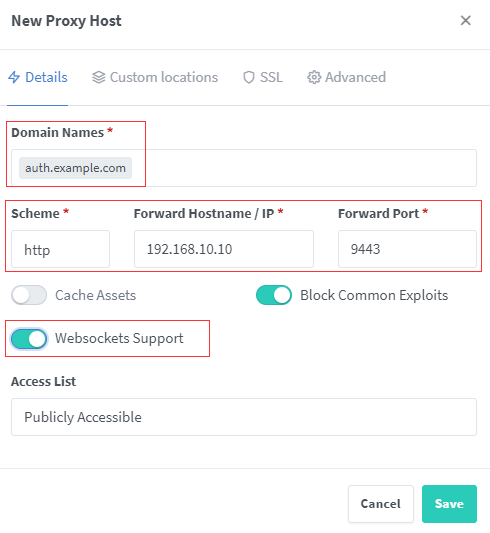
make sure you can enabledWebsockets Supportas above. Add a valid certificate from SSL tab. once everything done. you will be able to access the authentik fromhttps://auth.example.com
Enable SSO to an App
Here is the final part, let's assume that you are running an app on https://app.example.com and need to add authentication to the same.
login to your authentik installation's admin panel

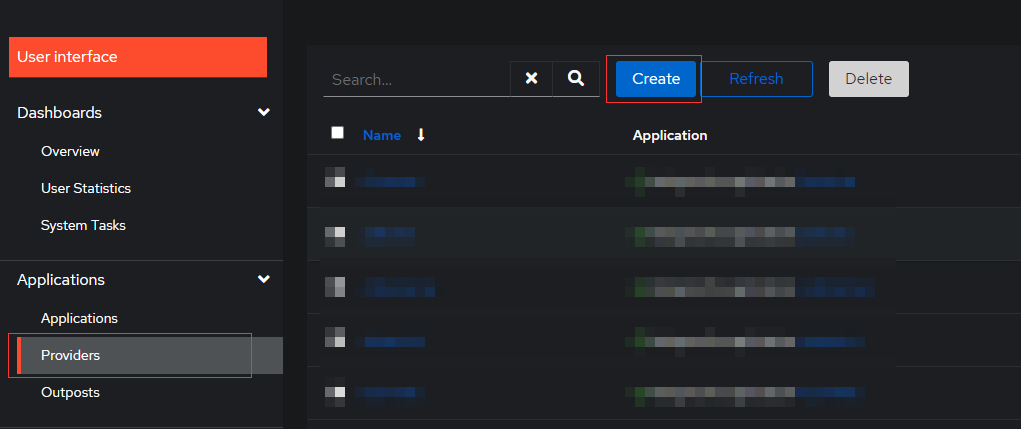
Create New Provider
Select Providers under Application tab on left hand side. Create new Proxy Provider
Name: Your apps name
Authorization Flow: Authorize Application IMPLICIT content (this makes things easier)
Type : Forward auth (single application)
External Host: Your app address https://app.example.com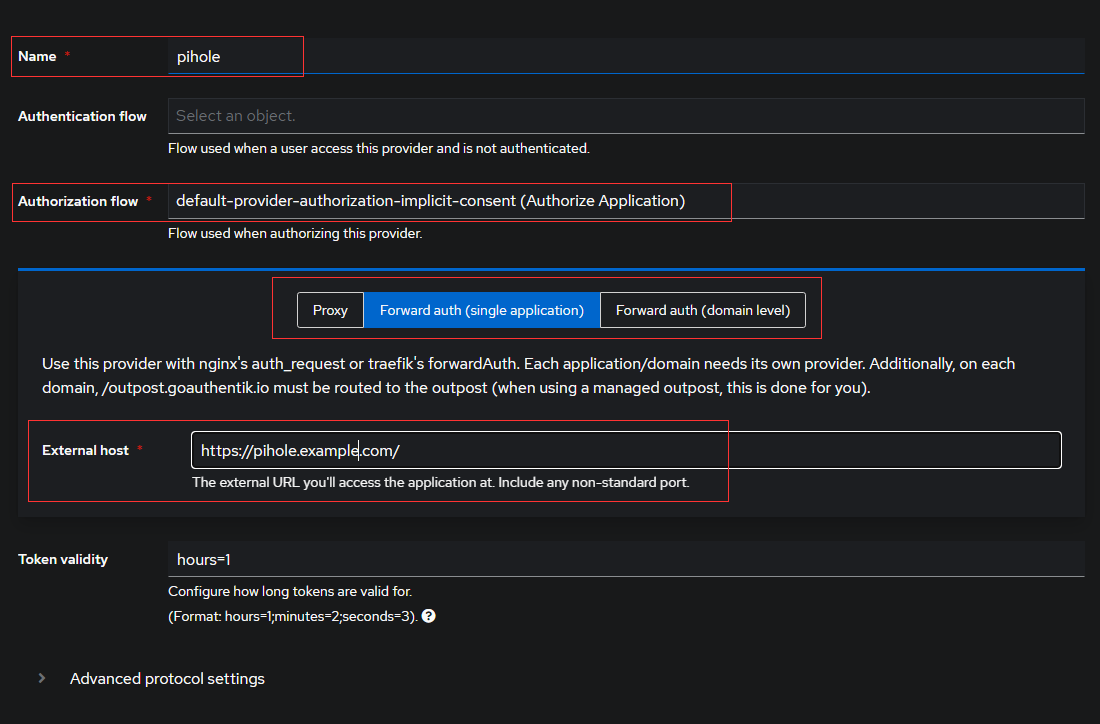
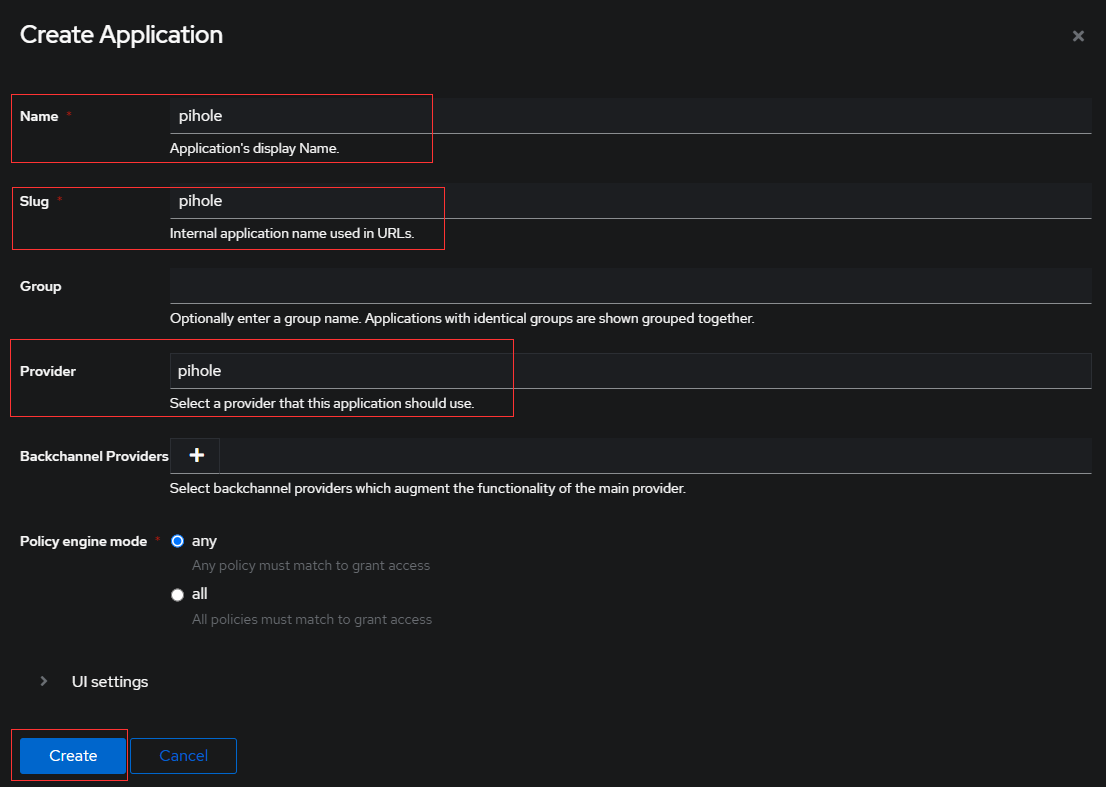
Create New App
Select Applications from left hand side and Create new app as below.
make sure you select the provider, the one create above.
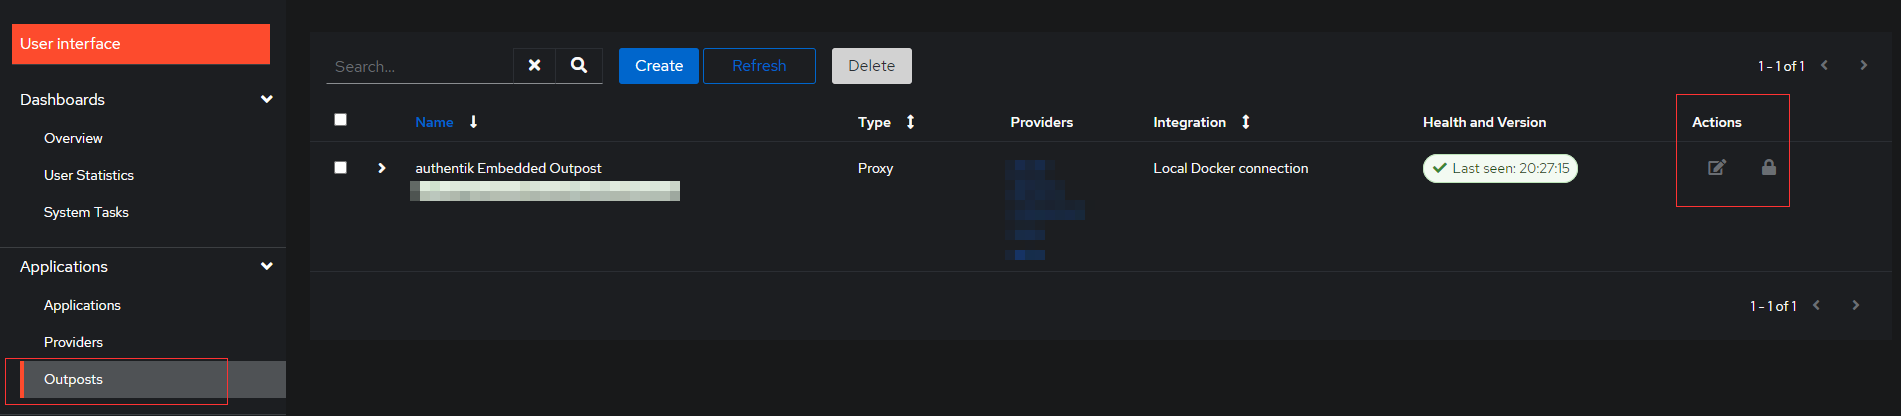
Modify Outpost
Select Outpost as shown in below, and Select the edit button.
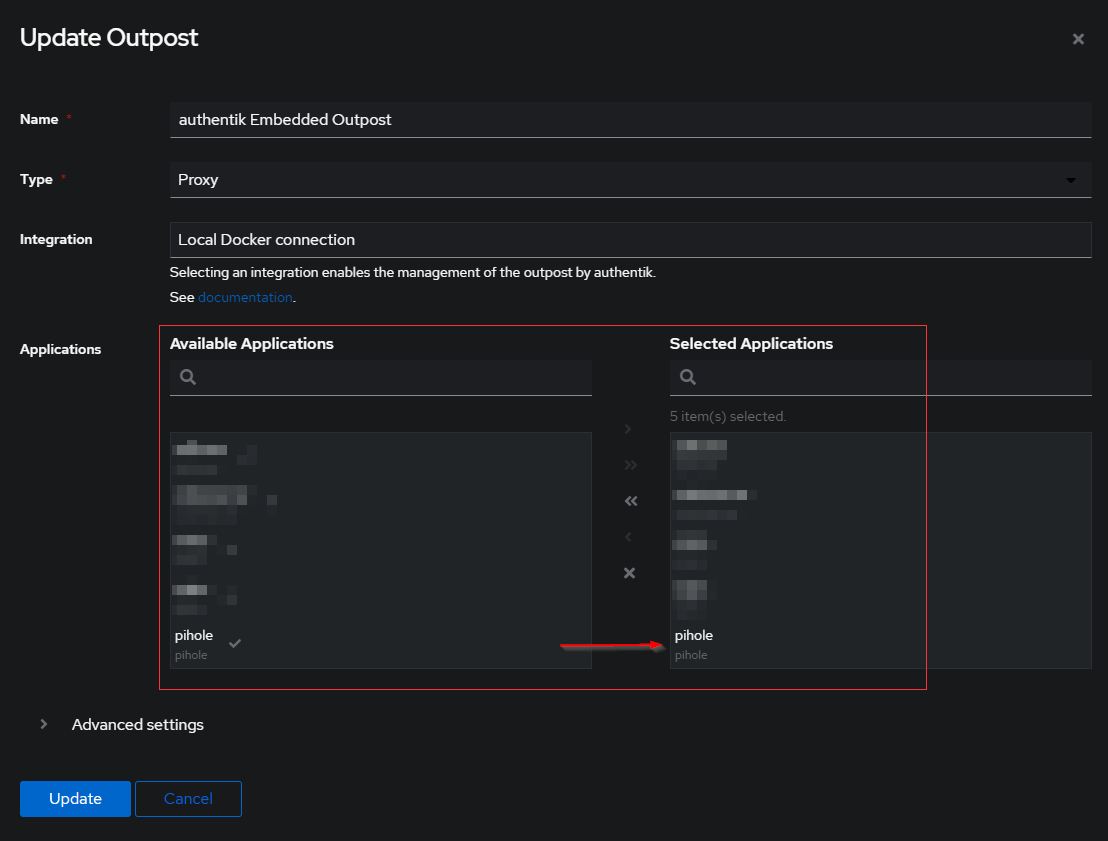
Select you application under Application tab. if you have multiple applications, you need to hold your control button and select all. otherwise redirection wont work. once done update.
Add Proxy Pass in Nginx-Proxy-Manager
once you created and configured your application in authentik, you need to tell the NPM to forward the authentication request to authentik server
login to the NPM Server and edit the application proxy entry. and Select Advanced tab
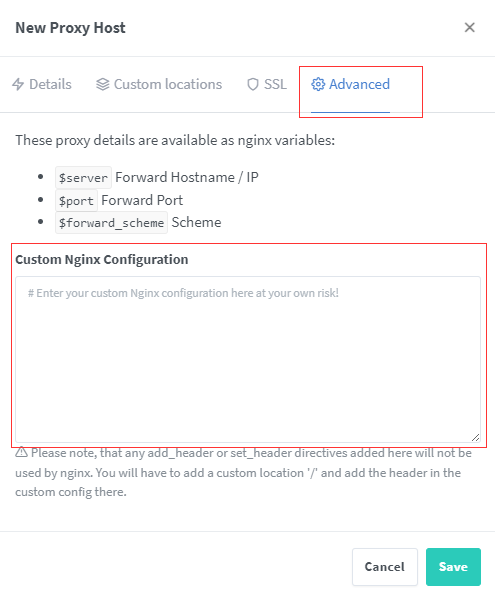
You need to paste below code.
# Increase buffer size for large headers
# This is needed only if you get 'upstream sent too big header while reading response
# header from upstream' error when trying to access an application protected by goauthentik
proxy_buffers 8 16k;
proxy_buffer_size 32k;

location / {
    # Put your proxy_pass to your application here
    proxy_pass          $forward_scheme://$server:$port;

    # authentik-specific config
    auth_request        /outpost.goauthentik.io/auth/nginx;
    error_page          401 = @goauthentik_proxy_signin;
    auth_request_set $auth_cookie $upstream_http_set_cookie;
    add_header Set-Cookie $auth_cookie;

    # translate headers from the outposts back to the actual upstream
    auth_request_set $authentik_username $upstream_http_x_authentik_username;
    auth_request_set $authentik_groups $upstream_http_x_authentik_groups;
    auth_request_set $authentik_email $upstream_http_x_authentik_email;
    auth_request_set $authentik_name $upstream_http_x_authentik_name;
    auth_request_set $authentik_uid $upstream_http_x_authentik_uid;

    proxy_set_header X-authentik-username $authentik_username;
    proxy_set_header X-authentik-groups $authentik_groups;
    proxy_set_header X-authentik-email $authentik_email;
    proxy_set_header X-authentik-name $authentik_name;
    proxy_set_header X-authentik-uid $authentik_uid;
}

# all requests to /outpost.goauthentik.io must be accessible without authentication
location /outpost.goauthentik.io {
    proxy_pass          http://auth.example.com/outpost.goauthentik.io;
    # ensure the host of this vserver matches your external URL you've configured
    # in authentik
    proxy_set_header    Host $host;
    proxy_set_header    X-Original-URL $scheme://$http_host$request_uri;
    add_header          Set-Cookie $auth_cookie;
    auth_request_set    $auth_cookie $upstream_http_set_cookie;

    # required for POST requests to work
    proxy_pass_request_body off;
    proxy_set_header Content-Length "";
}

# Special location for when the /auth endpoint returns a 401,
# redirect to the /start URL which initiates SSO
location @goauthentik_proxy_signin {
    internal;
    add_header Set-Cookie $auth_cookie;
    return 302 /outpost.goauthentik.io/start?rd=$request_uri;
    # For domain level, use the below error_page to redirect to your authentik server with the full redirect path
    # return 302 https://authentik.company/outpost.goauthentik.io/start?rd=$scheme://$http_host$request_uri;
}
Make sure you have changed the authentik proxy pass config. either you can use internal IP address with port number or public address
proxy_pass https://auth.example.com/outpost.goauthentik.io;
proxy_pass http://10.10.20.25:9090/outpost.goauthentik.io;
Test the Login
Once everything done, you can access your application, you will be redirect to SSO login.

Common Issues after Installation
listing few of common issues that I saw on my post comments and Reddit post.
1. Getting 500 error after installation
Common cause is Authentik instance is not reachable from NPM installation, You need to make sure both instance have reachability.
Try to change the Authentik instance address to IP address or hostname with relevant port number.
As GitHub user Matt-ghub you can put both Authentik and NPM on same Docker network and use Authentik IP address and port number in outpost configuration. Here is the comment
2. Getting WebSocket error
If you are getting WebSocket error, make sure you have enabled WebSocket option in NPM proxy host, as I mentioned in my guide. Still if you have any issue follow official Authentik Guide on reverse proxy and tweak your config
3. Unhealthy Outpost status in dashboard
Commonly this happen if something you messed up in your docker-compose.yml file. try to recreate the stack or do a docker-compose down and docker-compose up
4. Authentik Issue with KASM Web
I have received a comment on my inbox regarding Authentik Issue with KASM Web, if anyone facing issue, Please check out this reddit post
you may need to add additional headers as below in the Nginx Config
proxy_set_header Upgrade $http_upgrade;
proxy_set_header Connection "upgrade";
This is the old comment section (for reference only), for any question please make use of below remark42